
Another one of my lovely friends got married last week and I was lucky enough to be a bridesmaid again! It was such a brilliant day, great fun and everything about the day reflected her style and personality perfectly. As a wedding gift for the happy couple, and a reminder of the day, I designed and cross stitched a sampler style momento. The colours and patterns match themes from the wedding day, as well as embroidering the place and date of the wedding at the bottom. I love the simplicity of this idea and would love to eventually offer a customised wedding or baby cross stitch sampler on my Etsy shop... Pick two colours, a few different themes and a message and away I go! What do you think?

Tuesday 3 September 2013
Another wedding gift!
Monday 2 September 2013
Wedding Quilt
Earlier this year my best and oldest friend got married and I was privileged enough to be one of her bridesmaids. I've known her since I was three years old, and we were in the same school class as each other all the way from nursery through to college. It's for this reason I wanted to get her something meaningful. I decided to make her a patchwork quilt... with three weeks to go until the wedding.
Despite working late nights and weekends on it, needless to say, I didn't finish it in time! But three months later it was finally finished and here it is...

I wanted to create something that was traditional and modern and old and new. The design is a traditional type pinwheel quilt, but the colours I chose are fresh and contemporary. The fabrics are a mixture of new and old vintage fabrics I had got from my Grandma.
I also hand embroidered a little keepsake ticket and attached it to the back of the quilt, as a reminder of the day.

Thursday 28 March 2013
First Quilt Finished
I don't suppose anyone remembers this post about a quilt I was working on nearly three years ago? Well believe it or not, it finally got finished and now adorns the bed in my guest room. These lovely sunny pictures were taken on a beautiful summer's day, back in July 2011...
I've not started another one, until recently... but more on that soon.
 |
| From First Quilt Finished |
 |
| From First Quilt Finished |
Tuesday 26 March 2013
Oil Colour Inspiration
You know when you see a random painting, or other thing of beauty, that just makes you want to crack out the oil paints, dust off that sewing machine or sharpen your scissors. Today that thing was this painting, by Christina Renfer Vogel.
 I love the colours and light, it made me smile, but more importantly it made me want to paint again.
I love the colours and light, it made me smile, but more importantly it made me want to paint again.
Long time coming...
It's been too long. A lot has happened since I last posted. I bought a house and got a promotion at work, all of which has contributed towards having absolutely no spare time for crafts and blogging. But anyway, enough of the excuses, I am now ready to start posting again about everything that's happened over the past two years and everything that will be happening in future! Stay tuned...
Wednesday 30 March 2011
Parker Knoll Fireside Chairs
Since I signed up to my upholstery course I have not been able to stop looking at chairs. I simply can't wait until July to start the course and have been scouring Freecycle, Gumtree, Ebay and the local charity furniture shops for a project to get me started. So when these little beauties appeared on Gumtree at a bargain price, how could I resist?
They are a pair of 1960s Parker Knoll Fireside Chairs, model PK988 to be exact. They were in fairly good form when I picked them up apart from the hideous brown draylon velvet they had been upholstered in. I couldn't contain myself and stripped one of the chairs completely as soon as I got my hands on it! Mmmm look at those curves...
The frames are solid teak wood and apart from a few scratches are in good condition. And look what I found under the upholstery when I stripped it off! The original label with model number and the date they were made 19.4.67. I love finding things like this, it makes something that little bit more special and interesting.
I plan to strip off the orange tinted varnish, that most 1960s furniture is coated in, to take the wood back to it's natural colour. Then I'll reupholster it in fairly modern bold print, although I am still undecided on this. There are so many stunning fabrics out there, most of which are out of my price range, so I may look into printing my own. Check out this beautiful example of what I am trying to achieve, from the talented people at RESTORE in Cape Town.
Stay tuned for the rest of this revamp...
 |
| From Parker Knoll Revamp |
They are a pair of 1960s Parker Knoll Fireside Chairs, model PK988 to be exact. They were in fairly good form when I picked them up apart from the hideous brown draylon velvet they had been upholstered in. I couldn't contain myself and stripped one of the chairs completely as soon as I got my hands on it! Mmmm look at those curves...
 |
| From Parker Knoll Revamp |
The frames are solid teak wood and apart from a few scratches are in good condition. And look what I found under the upholstery when I stripped it off! The original label with model number and the date they were made 19.4.67. I love finding things like this, it makes something that little bit more special and interesting.
 |
| From Parker Knoll Revamp |
I plan to strip off the orange tinted varnish, that most 1960s furniture is coated in, to take the wood back to it's natural colour. Then I'll reupholster it in fairly modern bold print, although I am still undecided on this. There are so many stunning fabrics out there, most of which are out of my price range, so I may look into printing my own. Check out this beautiful example of what I am trying to achieve, from the talented people at RESTORE in Cape Town.
Stay tuned for the rest of this revamp...
Monday 7 March 2011
Kaleidoscope Block Printing
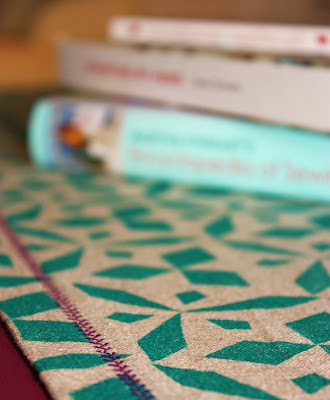
Finally, my first piece of printed fabric!!! Remember I said that one of my newest sources of inspiration was my kaleidoscope? Well I designed a repeating pattern based on the reflected geometric shapes and turned it into a printing block! The printing block was made from 5mm thick foam sheets cut to shape and glued onto a block of wood. I used my new Permaset Aqua fabric inks to mix up a lovely teal green colour to compliment the natural tones of the linen union basecloth.
And here it is! The finished article. I decided to make the fabric into a tablecloth runner for my purple coffee table. I hemmed the tablecloth with one of my fancy decorative stitches on my sewing machine that I have never used before. I think the purple contrasting thread colour finishes it nicely.
There were a few things that I think I would do differently next time. I mounted the foam block print on a piece of wood but this meant it was extremely difficult to see where I was lining up the pattern match, so I will keep a look out for some transparent Perspex to mount the foam on next time. Also I used a foam roller to apply the ink to the block. This meant that as well as coating the top of the foam, I also coated the sides of the foam and the wood backing. When I was printing, there were a lot of places where the ink from the edge of the wood got onto the fabric and the print did not have nice crisp edges. To solve this I think I will invest in a rubber brayer or two, so less ink gets where it is not supposed to.
I'm pretty happy with the outcome for my first try and I am definately doing this again, it was so much fun!
 |
| From Block Printing March 2011 |
And here it is! The finished article. I decided to make the fabric into a tablecloth runner for my purple coffee table. I hemmed the tablecloth with one of my fancy decorative stitches on my sewing machine that I have never used before. I think the purple contrasting thread colour finishes it nicely.
 |
| From Block Printing March 2011 |
There were a few things that I think I would do differently next time. I mounted the foam block print on a piece of wood but this meant it was extremely difficult to see where I was lining up the pattern match, so I will keep a look out for some transparent Perspex to mount the foam on next time. Also I used a foam roller to apply the ink to the block. This meant that as well as coating the top of the foam, I also coated the sides of the foam and the wood backing. When I was printing, there were a lot of places where the ink from the edge of the wood got onto the fabric and the print did not have nice crisp edges. To solve this I think I will invest in a rubber brayer or two, so less ink gets where it is not supposed to.
 |
| From Block Printing March 2011 |
I'm pretty happy with the outcome for my first try and I am definately doing this again, it was so much fun!
Subscribe to:
Posts (Atom)
